Difference between revisions of "Arduino Environment and Esp8266"
m (Daniel moved page Arduino Enfironment and Esp8266 to Arduino Environment and Esp8266) |
(→Installation) |
||
| Line 2: | Line 2: | ||
Arduino IDE 1.6.x or newer is needed (I tried it on version 1.6.8). | Arduino IDE 1.6.x or newer is needed (I tried it on version 1.6.8). | ||
| − | + | * Open the Arduino IDE and go to "File -> Preferences" | |
| − | + | ||
| − | + | [[File:esp8266_arduino_00.png]] | |
| + | |||
| + | * In the field "Additional Boards Manager URLs" introduce <code>http://arduino.esp8266.com/stable/package_esp8266com_index.json</code> and click OK. | ||
| + | |||
| + | [[File:esp8266_arduino_01.png]] | ||
| + | |||
| + | * Then go to "Tools -> Boards -> Boards Manager" and in the box "Type" select “Contributed”. Select the “esp8266 by ESP8266 Community” package and click the “Install” button. | ||
| + | |||
| + | [[File:esp8266_arduino_02.png]] | ||
| + | |||
| + | * Now you can select the board for developing from "Tools -> Boards->ESP8266 Modules" and choose the board you want to program. | ||
| + | |||
| + | [[File:esp8266_arduino_03.png]] | ||
| + | |||
| + | == First Program == | ||
| + | |||
| + | <syntaxhighlight lang="C" line="1" > | ||
| + | int pin = 16; // D0 pin in NodeMCU | ||
| + | int i = 0; | ||
| + | |||
| + | // the setup function runs once when you press reset or power the board | ||
| + | void setup() { | ||
| + | Serial.begin(115200); | ||
| + | |||
| + | // initialize digital pin 16 (D0) as an output. | ||
| + | pinMode(pin, OUTPUT); | ||
| + | } | ||
| + | |||
| + | // the loop function runs over and over again forever | ||
| + | void loop() { | ||
| + | Serial.print("Line "); | ||
| + | Serial.println(i); | ||
| + | i++; | ||
| + | digitalWrite(pin, HIGH); // turn the LED on (HIGH is the voltage level) | ||
| + | delay(100); // wait for a second | ||
| + | digitalWrite(pin, LOW); // turn the LED off by making the voltage LOW | ||
| + | delay(900); // wait for a second | ||
| + | } | ||
| + | </syntaxhighlight> | ||
| + | |||
| + | == Pin Mapping == | ||
| + | |||
| + | <syntaxhighlight lang="C" line="0" > | ||
| + | static const uint8_t D0 = 16; | ||
| + | static const uint8_t D1 = 5; | ||
| + | static const uint8_t D2 = 4; | ||
| + | static const uint8_t D3 = 0; | ||
| + | static const uint8_t D4 = 2; | ||
| + | static const uint8_t D5 = 14; | ||
| + | static const uint8_t D6 = 12; | ||
| + | static const uint8_t D7 = 13; | ||
| + | static const uint8_t D8 = 15; | ||
| + | static const uint8_t D9 = 3; | ||
| + | static const uint8_t D10 = 1; | ||
| + | </syntaxhighlight> | ||
Revision as of 13:26, 26 April 2016
Installation
Arduino IDE 1.6.x or newer is needed (I tried it on version 1.6.8).
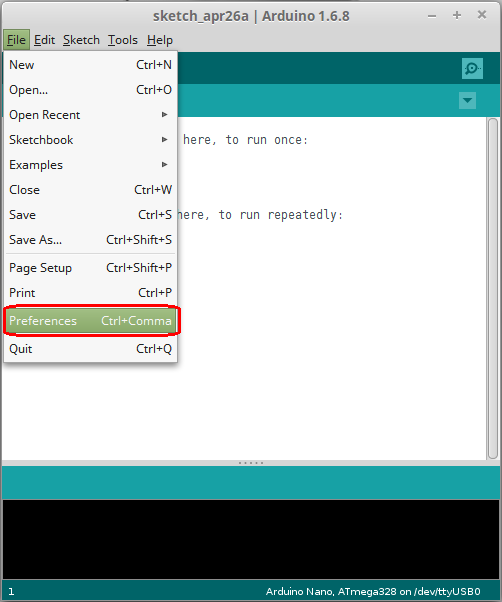
- Open the Arduino IDE and go to "File -> Preferences"
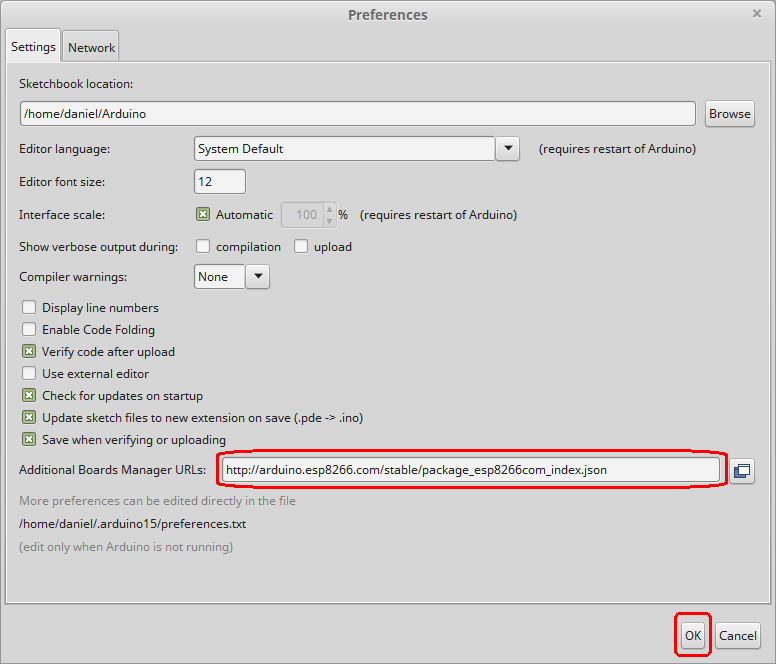
- In the field "Additional Boards Manager URLs" introduce
http://arduino.esp8266.com/stable/package_esp8266com_index.jsonand click OK.
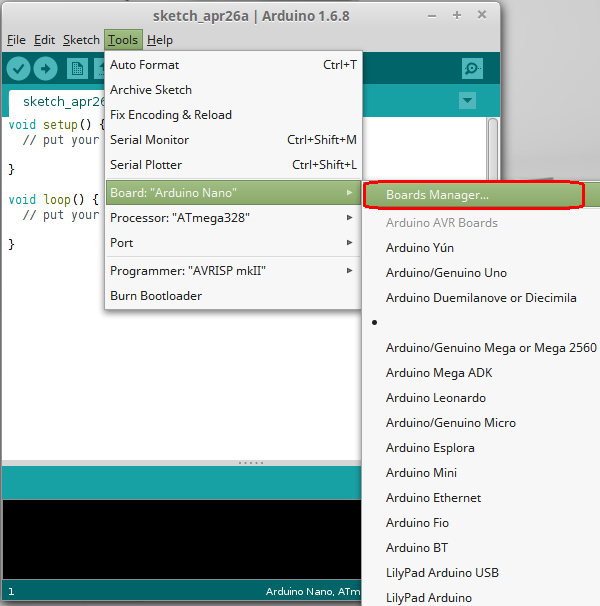
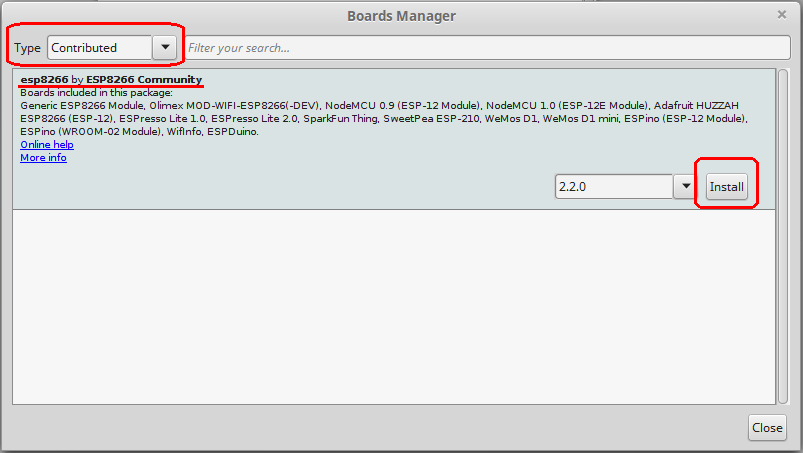
- Then go to "Tools -> Boards -> Boards Manager" and in the box "Type" select “Contributed”. Select the “esp8266 by ESP8266 Community” package and click the “Install” button.
- Now you can select the board for developing from "Tools -> Boards->ESP8266 Modules" and choose the board you want to program.
First Program
 1 int pin = 16; // D0 pin in NodeMCU
 2 int i = 0;
 3
 4 // the setup function runs once when you press reset or power the board
 5 void setup() {
 6   Serial.begin(115200);
 7
 8   // initialize digital pin 16 (D0) as an output.
 9   pinMode(pin, OUTPUT);
10 }
11
12 // the loop function runs over and over again forever
13 void loop() {
14   Serial.print("Line ");
15   Serial.println(i);
16   i++;
17   digitalWrite(pin, HIGH);   // turn the LED on (HIGH is the voltage level)
18   delay(100);              // wait for a second
19   digitalWrite(pin, LOW);    // turn the LED off by making the voltage LOW
20   delay(900);              // wait for a second
21 }
Pin Mapping
 1 static const uint8_t D0   = 16;
 2 static const uint8_t D1   = 5;
 3 static const uint8_t D2   = 4;
 4 static const uint8_t D3   = 0;
 5 static const uint8_t D4   = 2;
 6 static const uint8_t D5   = 14;
 7 static const uint8_t D6   = 12;
 8 static const uint8_t D7   = 13;
 9 static const uint8_t D8   = 15;
10 static const uint8_t D9   = 3;
11 static const uint8_t D10  = 1;


