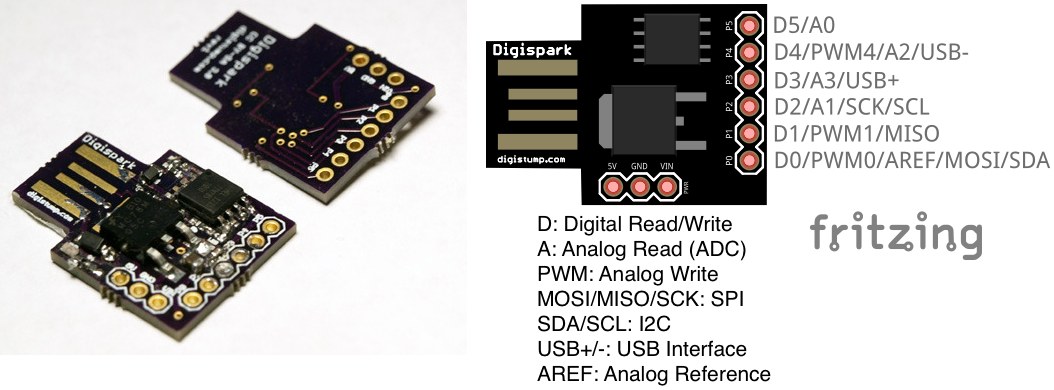
Digispark
The Digispark is an Attiny85 based microcontroller development board similar to the Arduino line, perfect for when an Arduino is too big. The
Contents
Specification
- Attiny85
- Power via USB or External Source (regulated 5v or 7-35v, 12v or less recommended with automatic selection)
- On-board 500ma 5V Regulator
- Built-in USB
- 6 I/O Pins (2 are used for USB only if your program actively communicates over USB, otherwise you can use all 6 even if you are programming via USB)
- 8k Flash Memory (about 6k after bootloader)
- I2C and SPI (vis USI)
- PWM on 3 pins (more possible with Software PWM)
- ADC on 4 pins
- Power LED and Test/Status LED
Add Digispark to Fritzing: File:Digispark-fritzing.zip
Installation
Arduino IDE 1.6.5 or newer is needed (I tried it on version 1.6.7).
- Go to "File -> Preferences" and in the field "Additional Boards Manager URLs" introduce http://digistump.com/package_digistump_index.json and click OK.
- Then go to "Tools -> Boards -> Boards Manager" and in the box "Type" select “Contributed”. Select the “Digistump AVR Boards” package and click the “Install” button.
- If you are using GNU/Linux you might need to add the rules for the USB programming device.
- Now you can select the board for developing from "Tools -> Boards", most probably the device you have is “Digispark (Default - 16.5mhz)”.
Linux Rules
If you are running GNU/Linux and getting errors on upload or other strange results you might need to add the USB device to udev. You must place the udev rules below into a file named /etc/udev/rules.d/49-micronucleus.rules
Create the /etc/udev/rules.d/49-micronucleus.rules files with this content (setting up the correct permissions for user and group if desired):
# UDEV Rules for Micronucleus boards including the Digispark.
# This file must be placed at:
#
# /etc/udev/rules.d/49-micronucleus.rules    (preferred location)
#   or
# /lib/udev/rules.d/49-micronucleus.rules    (req'd on some broken systems)
#
# After this file is copied, physically unplug and reconnect the board.
#
SUBSYSTEMS=="usb", ATTRS{idVendor}=="16d0", ATTRS{idProduct}=="0753", MODE:="0666"
KERNEL=="ttyACM*", ATTRS{idVendor}=="16d0", ATTRS{idProduct}=="0753", MODE:="0666", ENV{ID_MM_DEVICE_IGNORE}="1"
#
# If you share your linux system with other users, or just don't like the
# idea of write permission for everybody, you can replace MODE:="0666" with
# OWNER:="yourusername" to create the device owned by you, or with
# GROUP:="somegroupname" and mange access using standard unix groups.
Then restart the system or run this command to apply the rules:
udevadm control --reload-rules
Program Upload
As opposed to most arduinos, to upload a new program to the device this should not be connected to the USB port. With the device unpluggled click on upload in the Arduino IDE and then connect the device to the USB port. The system will automatically detect it and upload the code.
