Difference between revisions of "Custom RBOT Board"
| (3 intermediate revisions by the same user not shown) | |||
| Line 52: | Line 52: | ||
</pre> | </pre> | ||
| − | + | Change the mcu type if you are using a different one and adjust the frequency and fuses accordingly. | |
| − | + | Then create the directory ''rbot'' in the ''arduino_installation_directory/hardware/arduino/avr/variants/'' and inside it create the file ''pins_arduino.h'' with this content: | |
<pre> | <pre> | ||
/* | /* | ||
| Line 87: | Line 87: | ||
#include <avr/pgmspace.h> | #include <avr/pgmspace.h> | ||
| − | #define NUM_DIGITAL_PINS | + | #define NUM_DIGITAL_PINS 22 |
#define NUM_ANALOG_INPUTS 6 | #define NUM_ANALOG_INPUTS 6 | ||
| − | #define analogInputToDigitalPin(p) ((p < 6) ? (p) + | + | #define analogInputToDigitalPin(p) ((p < 6) ? (p) + 16 : -1) |
#if defined(__AVR_ATmega8__) | #if defined(__AVR_ATmega8__) | ||
| Line 102: | Line 102: | ||
static const uint8_t SCK = 13; | static const uint8_t SCK = 13; | ||
| − | static const uint8_t SDA = | + | static const uint8_t SDA = 20; |
| − | static const uint8_t SCL = | + | static const uint8_t SCL = 21; |
#define LED_BUILTIN 13 | #define LED_BUILTIN 13 | ||
| − | static const uint8_t A0 = | + | static const uint8_t A0 = 16; |
| − | static const uint8_t A1 = | + | static const uint8_t A1 = 17; |
| − | static const uint8_t A2 = | + | static const uint8_t A2 = 18; |
| − | static const uint8_t A3 = | + | static const uint8_t A3 = 19; |
| − | static const uint8_t A4 = | + | static const uint8_t A4 = 20; |
| − | static const uint8_t A5 = | + | static const uint8_t A5 = 21; |
| − | static const uint8_t A6 = | + | static const uint8_t A6 = 22; |
| − | static const uint8_t A7 = | + | static const uint8_t A7 = 23; |
#define digitalPinToPCICR(p) (((p) >= 0 && (p) <= 21) ? (&PCICR) : ((uint8_t *)0)) | #define digitalPinToPCICR(p) (((p) >= 0 && (p) <= 21) ? (&PCICR) : ((uint8_t *)0)) | ||
| Line 139: | Line 139: | ||
// VCC 7| |22 GND | // VCC 7| |22 GND | ||
// GND 8| |21 AREF | // GND 8| |21 AREF | ||
| − | // (D | + | // (D 14) PB6 9| |20 AVCC |
| − | // (D | + | // (D 15) PB7 10| |19 PB5 (D 13) |
// PWM+ (D 5) PD5 11| |18 PB4 (D 12) | // PWM+ (D 5) PD5 11| |18 PB4 (D 12) | ||
// PWM+ (D 6) PD6 12| |17 PB3 (D 11) PWM | // PWM+ (D 6) PD6 12| |17 PB3 (D 11) PWM | ||
| Line 303: | Line 303: | ||
#endif | #endif | ||
</pre> | </pre> | ||
| + | |||
| + | The new mapping using the internal oscillator adds the D14 and D15 I/O pins that previously were used for the crystal. | ||
| + | |||
| + | [[File:Atmega368rbotPinMap.png]] | ||
| + | |||
| + | Now the Arduino IDE will have the RBOT option ready to use: | ||
| + | |||
| + | [[File:Arduino_rbot.png]] | ||
Latest revision as of 21:07, 6 July 2016
Sometimes you will not find an Arduino board that fits the needs of your projects and you might want to use a different Atmel microcontroller. In this section we will explain how to integrate your custom board into the Arduino IDE so that you can use it to program it.
Add this text to the end of the board.txt file found at the arduino_installation_directory/hardware/arduino/avr directory:
##############################################################

rbot.name=RBOT

rbot.upload.tool=avrdude
rbot.upload.protocol=arduino

rbot.bootloader.tool=avrdude
rbot.bootloader.unlock_bits=0x3F
rbot.bootloader.lock_bits=0x0F

rbot.build.board=AVR_PRO
rbot.build.core=arduino
rbot.build.variant=rbot

## Arduino Pro or Pro Mini (3V, 1 MHz) w/ ATmega328
## -------------------------------------------------
rbot.menu.cpu.1MHzatmega328=ATmega328 (3V, 1 MHz)

rbot.menu.cpu.1MHzatmega328.upload.maximum_size=30720
rbot.menu.cpu.1MHzatmega328.upload.maximum_data_size=2048
rbot.menu.cpu.1MHzatmega328.upload.speed=57600

rbot.menu.cpu.1MHzatmega328.bootloader.low_fuses=0x62
rbot.menu.cpu.1MHzatmega328.bootloader.high_fuses=0xD9
rbot.menu.cpu.1MHzatmega328.bootloader.extended_fuses=0x07
rbot.menu.cpu.1MHzatmega328.bootloader.file=atmega/ATmegaBOOT_168_atmega328.hex

rbot.menu.cpu.1MHzatmega328.build.mcu=atmega328
rbot.menu.cpu.1MHzatmega328.build.f_cpu=1000000L

## Arduino Pro or Pro Mini (3V, 8 MHz) w/ ATmega328
## -------------------------------------------------
rbot.menu.cpu.8MHzatmega328=ATmega328 (3V, 8 MHz)

rbot.menu.cpu.8MHzatmega328.upload.maximum_size=30720
rbot.menu.cpu.8MHzatmega328.upload.maximum_data_size=2048
rbot.menu.cpu.8MHzatmega328.upload.speed=57600

rbot.menu.cpu.8MHzatmega328.bootloader.low_fuses=0xE2
rbot.menu.cpu.8MHzatmega328.bootloader.high_fuses=0xD9
rbot.menu.cpu.8MHzatmega328.bootloader.extended_fuses=0x07
rbot.menu.cpu.8MHzatmega328.bootloader.file=atmega/ATmegaBOOT_168_atmega328.hex

rbot.menu.cpu.8MHzatmega328.build.mcu=atmega328
rbot.menu.cpu.8MHzatmega328.build.f_cpu=8000000L
Change the mcu type if you are using a different one and adjust the frequency and fuses accordingly. Then create the directory rbot in the arduino_installation_directory/hardware/arduino/avr/variants/ and inside it create the file pins_arduino.h with this content:
/*
  pins_arduino.h - Pin definition functions for Arduino
  Part of Arduino - http://www.arduino.cc/

  Copyright (c) 2007 David A. Mellis

  This library is free software; you can redistribute it and/or
  modify it under the terms of the GNU Lesser General Public
  License as published by the Free Software Foundation; either
  version 2.1 of the License, or (at your option) any later version.

  This library is distributed in the hope that it will be useful,
  but WITHOUT ANY WARRANTY; without even the implied warranty of
  MERCHANTABILITY or FITNESS FOR A PARTICULAR PURPOSE.  See the GNU
  Lesser General Public License for more details.

  You should have received a copy of the GNU Lesser General
  Public License along with this library; if not, write to the
  Free Software Foundation, Inc., 59 Temple Place, Suite 330,
  Boston, MA  02111-1307  USA
*/

/*
  Modified to use the internal clock and use the clock pins as
  digital I/O by Daniel Rubio Bonilla in 2016 for the RBOT board
 */

#ifndef Pins_Arduino_h
#define Pins_Arduino_h

#include <avr/pgmspace.h>

#define NUM_DIGITAL_PINS            22
#define NUM_ANALOG_INPUTS           6
#define analogInputToDigitalPin(p)  ((p < 6) ? (p) + 16 : -1)

#if defined(__AVR_ATmega8__)
#define digitalPinHasPWM(p)         ((p) == 9 || (p) == 10 || (p) == 11)
#else
#define digitalPinHasPWM(p)         ((p) == 3 || (p) == 5 || (p) == 6 || (p) == 9 || (p) == 10 || (p) == 11)
#endif

static const uint8_t SS   = 10;
static const uint8_t MOSI = 11;
static const uint8_t MISO = 12;
static const uint8_t SCK  = 13;

static const uint8_t SDA = 20;
static const uint8_t SCL = 21;
#define LED_BUILTIN 13

static const uint8_t A0 = 16;
static const uint8_t A1 = 17;
static const uint8_t A2 = 18;
static const uint8_t A3 = 19;
static const uint8_t A4 = 20;
static const uint8_t A5 = 21;
static const uint8_t A6 = 22;
static const uint8_t A7 = 23;

#define digitalPinToPCICR(p)    (((p) >= 0 && (p) <= 21) ? (&PCICR) : ((uint8_t *)0))
#define digitalPinToPCICRbit(p) (((p) <= 7) ? 2 : (((p) <= 13) ? 0 : 1))
#define digitalPinToPCMSK(p)    (((p) <= 7) ? (&PCMSK2) : (((p) <= 13) ? (&PCMSK0) : (((p) <= 21) ? (&PCMSK1) : ((uint8_t *)0))))
#define digitalPinToPCMSKbit(p) (((p) <= 7) ? (p) : (((p) <= 13) ? ((p) - 8) : ((p) - 14)))

#define digitalPinToInterrupt(p)  ((p) == 2 ? 0 : ((p) == 3 ? 1 : NOT_AN_INTERRUPT))

#ifdef ARDUINO_MAIN

// On the Arduino board, digital pins are also used
// for the analog output (software PWM).  Analog input
// pins are a separate set.

// ATMEL ATMEGA8 & 168 / ARDUINO
//
//                   +-\/-+
//             PC6  1|    |28  PC5 (AI 5)
//       (D 0) PD0  2|    |27  PC4 (AI 4)
//       (D 1) PD1  3|    |26  PC3 (AI 3)
//       (D 2) PD2  4|    |25  PC2 (AI 2)
// PWM+  (D 3) PD3  5|    |24  PC1 (AI 1)
//       (D 4) PD4  6|    |23  PC0 (AI 0)
//             VCC  7|    |22  GND
//             GND  8|    |21  AREF
//      (D 14) PB6  9|    |20  AVCC
//      (D 15) PB7 10|    |19  PB5 (D 13)
// PWM+  (D 5) PD5 11|    |18  PB4 (D 12)
// PWM+  (D 6) PD6 12|    |17  PB3 (D 11) PWM
//       (D 7) PD7 13|    |16  PB2 (D 10) PWM
//       (D 8) PB0 14|    |15  PB1 (D 9)  PWM
//                   +----+
//
// (PWM+ indicates the additional PWM pins on the ATmega168.)

// ATMEL ATMEGA1280 / ARDUINO
//
// 0-7 PE0-PE7   works
// 8-13 PB0-PB5  works
// 14-21 PA0-PA7 works
// 22-29 PH0-PH7 works
// 30-35 PG5-PG0 works
// 36-43 PC7-PC0 works
// 44-51 PJ7-PJ0 works
// 52-59 PL7-PL0 works
// 60-67 PD7-PD0 works
// A0-A7 PF0-PF7
// A8-A15 PK0-PK7


// these arrays map port names (e.g. port B) to the
// appropriate addresses for various functions (e.g. reading
// and writing)
const uint16_t PROGMEM port_to_mode_PGM[] = {
	NOT_A_PORT,
	NOT_A_PORT,
	(uint16_t) &DDRB,
	(uint16_t) &DDRC,
	(uint16_t) &DDRD,
};

const uint16_t PROGMEM port_to_output_PGM[] = {
	NOT_A_PORT,
	NOT_A_PORT,
	(uint16_t) &PORTB,
	(uint16_t) &PORTC,
	(uint16_t) &PORTD,
};

const uint16_t PROGMEM port_to_input_PGM[] = {
	NOT_A_PORT,
	NOT_A_PORT,
	(uint16_t) &PINB,
	(uint16_t) &PINC,
	(uint16_t) &PIND,
};

const uint8_t PROGMEM digital_pin_to_port_PGM[] = {
	PD, /* 0 */
	PD,
	PD,
	PD,
	PD,
	PD,
	PD,
	PD,
	PB, /* 8 */
	PB,
	PB,
	PB,
	PB,
	PB,
	PB,
	PB,
	PC, /* 16 */
	PC,
	PC,
	PC,
	PC,
	PC,
};

const uint8_t PROGMEM digital_pin_to_bit_mask_PGM[] = {
	_BV(0), /* 0, port D */
	_BV(1),
	_BV(2),
	_BV(3),
	_BV(4),
	_BV(5),
	_BV(6),
	_BV(7),
	_BV(0), /* 8, port B */
	_BV(1),
	_BV(2),
	_BV(3),
	_BV(4),
	_BV(5),
	_BV(6),
	_BV(7),
	_BV(0), /* 16, port C */
	_BV(1),
	_BV(2),
	_BV(3),
	_BV(4),
	_BV(5),
};

const uint8_t PROGMEM digital_pin_to_timer_PGM[] = {
	NOT_ON_TIMER, /* 0 - port D */
	NOT_ON_TIMER,
	NOT_ON_TIMER,
	// on the ATmega168, digital pin 3 has hardware pwm
#if defined(__AVR_ATmega8__)
	NOT_ON_TIMER,
#else
	TIMER2B,
#endif
	NOT_ON_TIMER,
	// on the ATmega168, digital pins 5 and 6 have hardware pwm
#if defined(__AVR_ATmega8__)
	NOT_ON_TIMER,
	NOT_ON_TIMER,
#else
	TIMER0B,
	TIMER0A,
#endif
	NOT_ON_TIMER,
	NOT_ON_TIMER, /* 8 - port B */
	TIMER1A,
	TIMER1B,
#if defined(__AVR_ATmega8__)
	TIMER2,
#else
	TIMER2A,
#endif
	NOT_ON_TIMER,
	NOT_ON_TIMER,
	NOT_ON_TIMER,
	NOT_ON_TIMER,
	NOT_ON_TIMER,
	NOT_ON_TIMER, /* 16 - port C */
	NOT_ON_TIMER,
	NOT_ON_TIMER,
	NOT_ON_TIMER,
	NOT_ON_TIMER,
};

#endif

// These serial port names are intended to allow libraries and architecture-neutral
// sketches to automatically default to the correct port name for a particular type
// of use.  For example, a GPS module would normally connect to SERIAL_PORT_HARDWARE_OPEN,
// the first hardware serial port whose RX/TX pins are not dedicated to another use.
//
// SERIAL_PORT_MONITOR        Port which normally prints to the Arduino Serial Monitor
//
// SERIAL_PORT_USBVIRTUAL     Port which is USB virtual serial
//
// SERIAL_PORT_LINUXBRIDGE    Port which connects to a Linux system via Bridge library
//
// SERIAL_PORT_HARDWARE       Hardware serial port, physical RX & TX pins.
//
// SERIAL_PORT_HARDWARE_OPEN  Hardware serial ports which are open for use.  Their RX & TX
//                            pins are NOT connected to anything by default.
#define SERIAL_PORT_MONITOR   Serial
#define SERIAL_PORT_HARDWARE  Serial

#endif
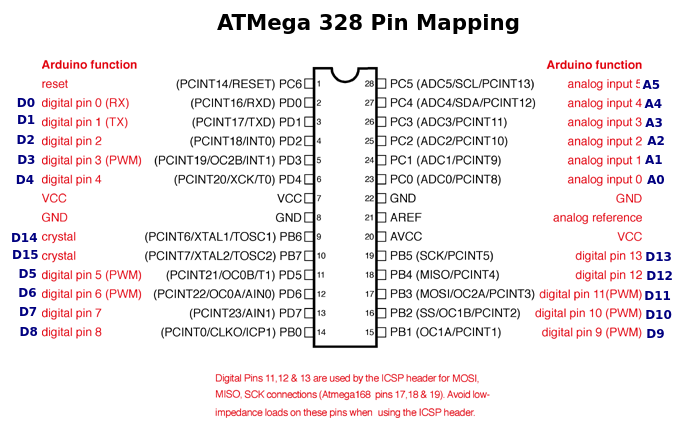
The new mapping using the internal oscillator adds the D14 and D15 I/O pins that previously were used for the crystal.
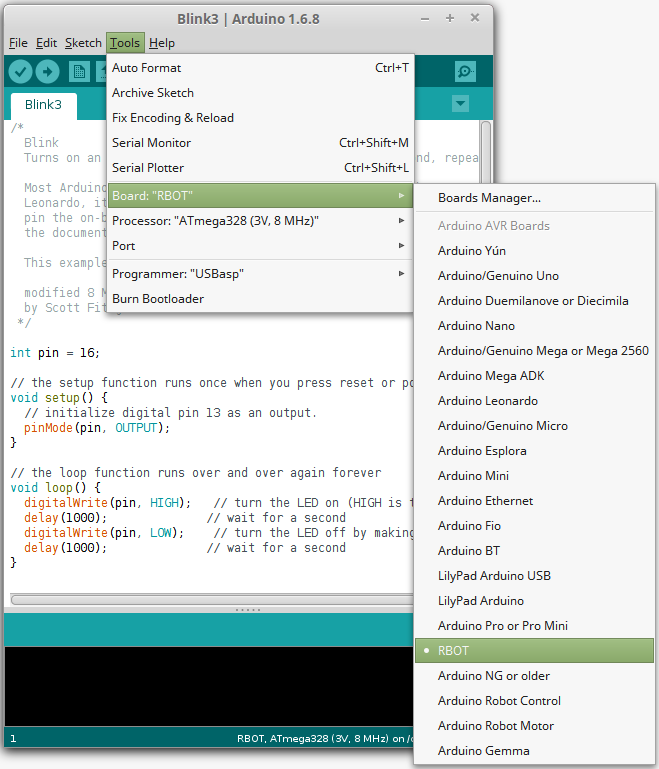
Now the Arduino IDE will have the RBOT option ready to use:

