Difference between revisions of "Creating a Guest Wi-Fi"
(Created page with "File:Dd-wrt guestwifi01.png File:Dd-wrt guestwifi02.png File:Dd-wrt guestwifi03.png File:Dd-wrt guestwifi04.png") |
|||
| Line 1: | Line 1: | ||
| + | Configuring a Guest Wi-Fi network that creates a virtual Access Point that provides access to the Internet but is isolated from our "home network" is fairly easy when using DD-WRT in the router. The screenshots shown in this tutorial are from DD-WRT version 25015. | ||
| + | |||
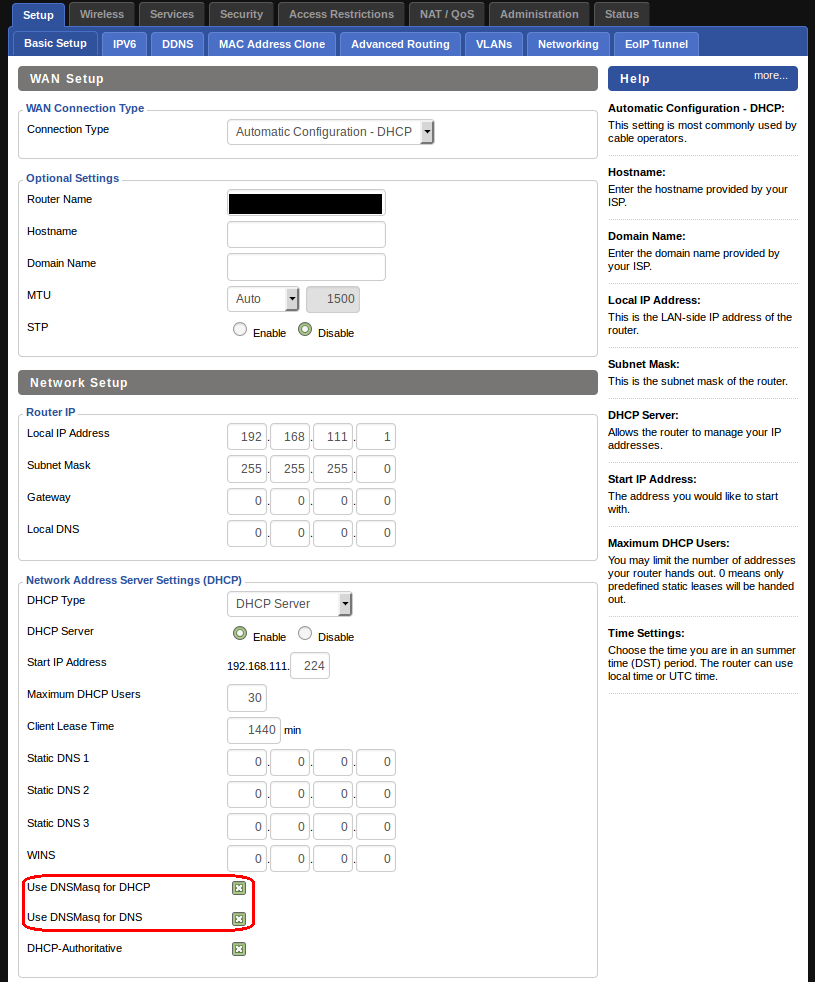
| + | First you should make sure that in '''Setup->Basic Setup->Networking Setup''' the options ''Use DNSMasq for DHCP'' and ''Use DNSMasq for DNS'' are selected. | ||
| + | Click on ''Save'' and then ''Apply Settings''. | ||
| + | |||
[[File:Dd-wrt guestwifi01.png]] | [[File:Dd-wrt guestwifi01.png]] | ||
| + | |||
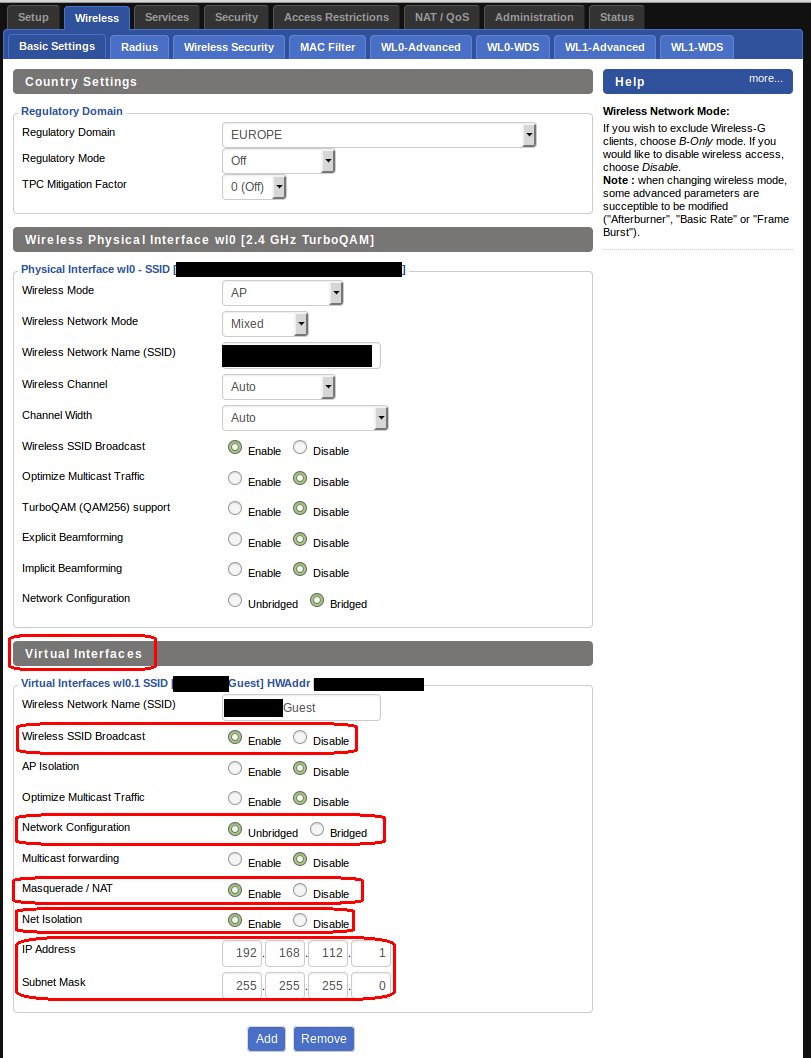
| + | Then in '''Wireless->Basic Settings->Virtual Interfaces''' you have to click in ''Add'' to create a new virtual interface (I do it just for the 2.4 Ghz Physical Interface as all devices can use this frequency but only a few will connect to the 5 Ghz band). Then set these options: | ||
| + | * Network Configuration: Unbridged (Disconnected from the local network.) | ||
| + | * Masquerade / NAT: Enable (Needed for Internet access.) | ||
| + | * Net Isolation: Enable (Do not allow access to the local network and the router.) | ||
| + | * IP Address: 192.168.xxx.1 (This is the ip of the virutal interface and it should be in a different network than the ''Network Setup'' from '''Setup->Basic Setup'''. For example, if you have ''Router IP'' set to 192.168.1.1, you can use 192.168.2.1) | ||
| + | * Netmask: 255.255.255.0 (Unless you know how netmask works, leave it like this.) | ||
| + | Click on ''Save'' and then ''Apply Settings''. | ||
[[File:Dd-wrt guestwifi02.png]] | [[File:Dd-wrt guestwifi02.png]] | ||
| + | |||
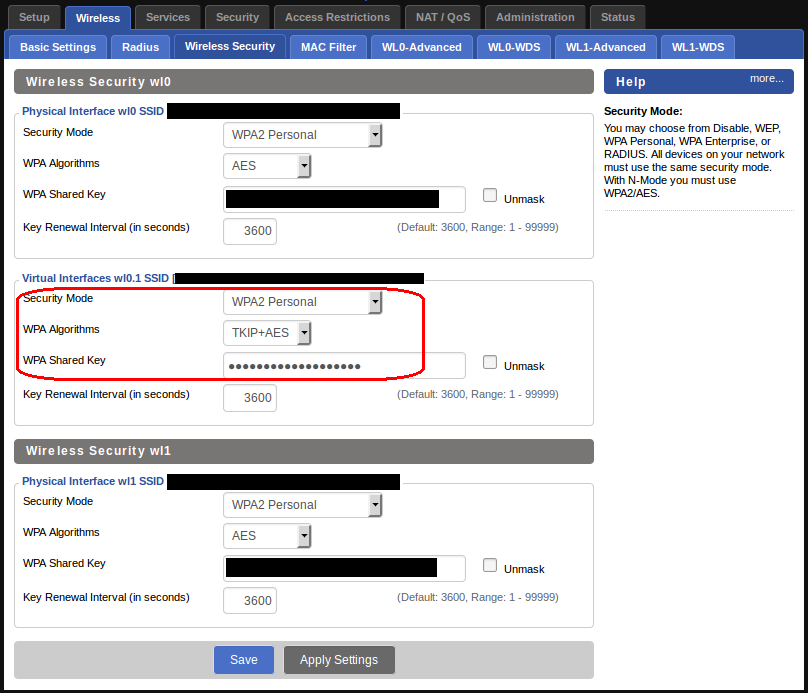
| + | Then you should enable the encryption key for the new network (this could be skipped, but then this network would be open to everybody). In '''Wireless->Wireless Security''' enable security and use a '''different''' ''Key'' value to your other Wireless connections. | ||
| + | Click on ''Save'' and then ''Apply Settings''. | ||
[[File:Dd-wrt guestwifi03.png]] | [[File:Dd-wrt guestwifi03.png]] | ||
| + | |||
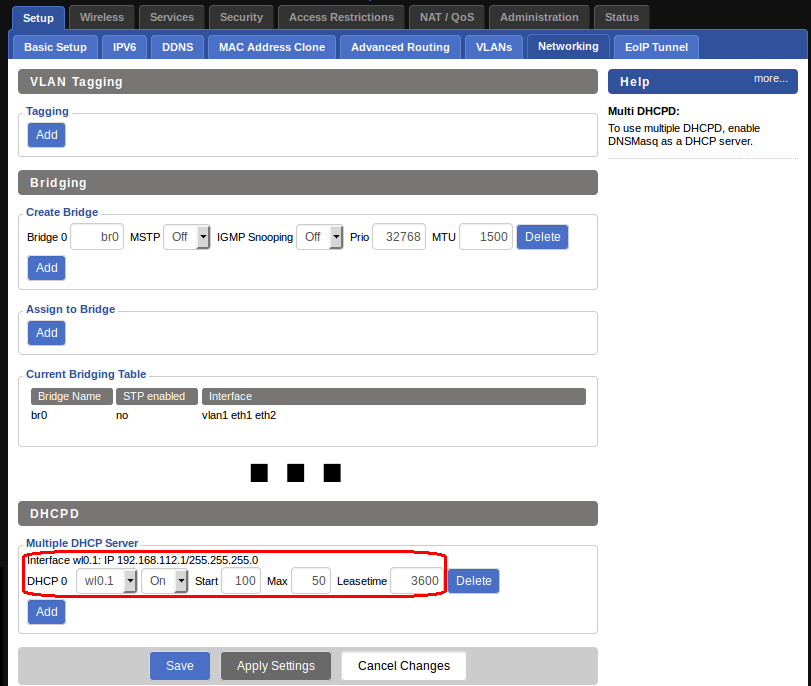
| + | The latest step is to enable another DHCP server so that IPs are asigned to the devices connecting to this network. In '''Setup->Networking->DHCPD''' add a DHCP with, select the virtual device (in the example wl0.1) and set it to ''ON''. | ||
| + | Click on ''Save'' and then ''Apply Settings''. | ||
[[File:Dd-wrt guestwifi04.png]] | [[File:Dd-wrt guestwifi04.png]] | ||
Latest revision as of 16:38, 20 October 2014
Configuring a Guest Wi-Fi network that creates a virtual Access Point that provides access to the Internet but is isolated from our "home network" is fairly easy when using DD-WRT in the router. The screenshots shown in this tutorial are from DD-WRT version 25015.
First you should make sure that in Setup->Basic Setup->Networking Setup the options Use DNSMasq for DHCP and Use DNSMasq for DNS are selected. Click on Save and then Apply Settings.
Then in Wireless->Basic Settings->Virtual Interfaces you have to click in Add to create a new virtual interface (I do it just for the 2.4 Ghz Physical Interface as all devices can use this frequency but only a few will connect to the 5 Ghz band). Then set these options:
- Network Configuration: Unbridged (Disconnected from the local network.)
- Masquerade / NAT: Enable (Needed for Internet access.)
- Net Isolation: Enable (Do not allow access to the local network and the router.)
- IP Address: 192.168.xxx.1 (This is the ip of the virutal interface and it should be in a different network than the Network Setup from Setup->Basic Setup. For example, if you have Router IP set to 192.168.1.1, you can use 192.168.2.1)
- Netmask: 255.255.255.0 (Unless you know how netmask works, leave it like this.)
Click on Save and then Apply Settings.
Then you should enable the encryption key for the new network (this could be skipped, but then this network would be open to everybody). In Wireless->Wireless Security enable security and use a different Key value to your other Wireless connections. Click on Save and then Apply Settings.
The latest step is to enable another DHCP server so that IPs are asigned to the devices connecting to this network. In Setup->Networking->DHCPD add a DHCP with, select the virtual device (in the example wl0.1) and set it to ON. Click on Save and then Apply Settings.


