Difference between revisions of "Using Qt for Android"
(Removed redirect to Using Qt for Android (July 2017)) (Tag: Removed redirect) |
|||
| (4 intermediate revisions by the same user not shown) | |||
| Line 1: | Line 1: | ||
= Installation = | = Installation = | ||
| + | * Qt 5.12.0 | ||
| + | * QtCreator 4.8.1 | ||
| + | * Android Studio 3.3 | ||
== Qt libraries and QtCreator == | == Qt libraries and QtCreator == | ||
| − | In the website of Qt, [https:// | + | In the website of Qt, [https://www.qt.io/download download the Qt installer open-source application development]. Then go to the directory where it is downloaded, make it executable and run it as root: |
<pre> | <pre> | ||
| − | chmod 777 qt-unified-linux-x64-3.0. | + | chmod 777 qt-unified-linux-x64-3.0.6-online.run |
| − | sudo ./qt-unified-linux-x64-3.0. | + | sudo ./qt-unified-linux-x64-3.0.6-online.run |
</pre> | </pre> | ||
| Line 19: | Line 22: | ||
[[File:qtinst2.png]] | [[File:qtinst2.png]] | ||
| − | Make sure that the Tools and a version of the Qt libraries are selected, inside it also select the android packages: | + | Make sure that the Tools and a version of the Qt libraries are selected, inside it also select the android packages (you can remove the sources packages and save some storage space): |
| − | [[File: | + | [[File:qtinst3b.png]] |
Once the installation is finished you can add the ''qtcreator'' executable to the system PATH or link into a directory that is already in it: | Once the installation is finished you can add the ''qtcreator'' executable to the system PATH or link into a directory that is already in it: | ||
| Line 31: | Line 34: | ||
== Android Tools & SDK == | == Android Tools & SDK == | ||
| − | + | We will use the [https://developer.android.com/studio/ Android Studio (that you can download here)] to install the necessary Android components. Go to the directory where it was downloaded, unzip it and execute it: | |
| + | |||
<pre> | <pre> | ||
| − | + | unzip android-studio-ide-xxx.yyyyyyy-linux.zip | |
| − | + | cd android-studio/bin | |
| − | + | ./studio.sh | |
| − | cd android- | ||
| − | |||
</pre> | </pre> | ||
| − | + | On the next screen, there is no need to import anything, but you can do it if you have a previous installation: | |
| − | + | ||
| − | + | [[File:As01.png]] | |
| − | . | + | |
| − | + | Then select custom installation: | |
| + | |||
| + | [[File:As02.png]] | ||
| − | + | Then select the "Android Virtual Device" option to be able to test the android applications in a simulated device in your computer. You can also change the installation path of the android components (for example, I like to have them in the hidden directory ".Android" inside the home of my user account): | |
| − | [[File: | + | [[File:As03.png]] |
| − | + | Then review the configuration and wait till all the android components are installed. When the starting window of the Android Studio start (if it does not start automatically, then launch it again) click on "Configure -> SDK Manager". Inside the SDK Manager click on "SDK Tools" and install the NDK component as shown in the picture: | |
| − | + | [[File:As05.png]] | |
| − | |||
| − | |||
| − | |||
| − | |||
| − | + | You can install other SDK platforms to support older versions of Android. | |
| − | |||
| − | |||
| − | |||
| − | |||
| − | |||
== Integrate Android Tools in QtCreator == | == Integrate Android Tools in QtCreator == | ||
| − | First install the necessary dependencies: | + | First install the necessary dependencies, which include the java openjdk version 8, as newer ones might not work: |
<pre> | <pre> | ||
| − | sudo apt | + | sudo apt install libstdc++6:i386 libgcc1:i386 zlib1g:i386 libncurses5:i386 libsdl1.2debian:i386 openjdk-8-jdk openjdk-8-jre |
</pre> | </pre> | ||
Then open QtCreator and go to the menu ''Tools -> Options -> Devices -> Android''. There set the paths to the different components as shown in the next image: | Then open QtCreator and go to the menu ''Tools -> Options -> Devices -> Android''. There set the paths to the different components as shown in the next image: | ||
| − | [[File: | + | [[File:Qtandroid01.png]] |
| − | + | If all goes fine, the QtCreator building Kits for Android are automatically added: | |
| − | [[File: | + | [[File:Qtandroid02.png]] |
From that moment QtCreator will be able to compile and generate apk files from your Qt applications so that they can be executed in Android. | From that moment QtCreator will be able to compile and generate apk files from your Qt applications so that they can be executed in Android. | ||
Latest revision as of 22:16, 20 January 2019
Contents
Installation
- Qt 5.12.0
- QtCreator 4.8.1
- Android Studio 3.3
Qt libraries and QtCreator
In the website of Qt, download the Qt installer open-source application development. Then go to the directory where it is downloaded, make it executable and run it as root:
chmod 777 qt-unified-linux-x64-3.0.6-online.run
sudo ./qt-unified-linux-x64-3.0.6-online.run
When the next window appears then click on skip to continue without registering:
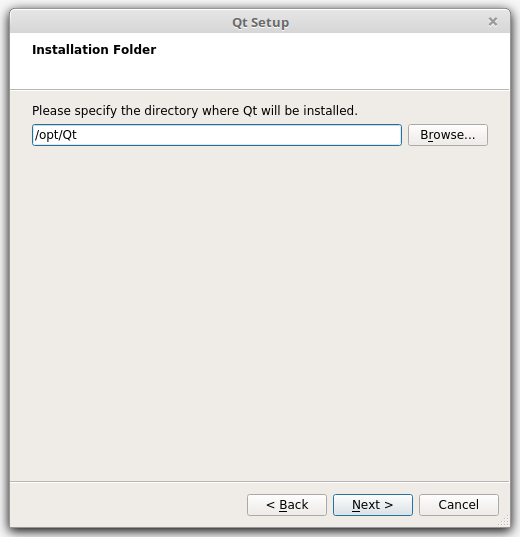
Then choose the installation path, the default one is usually a good choice:
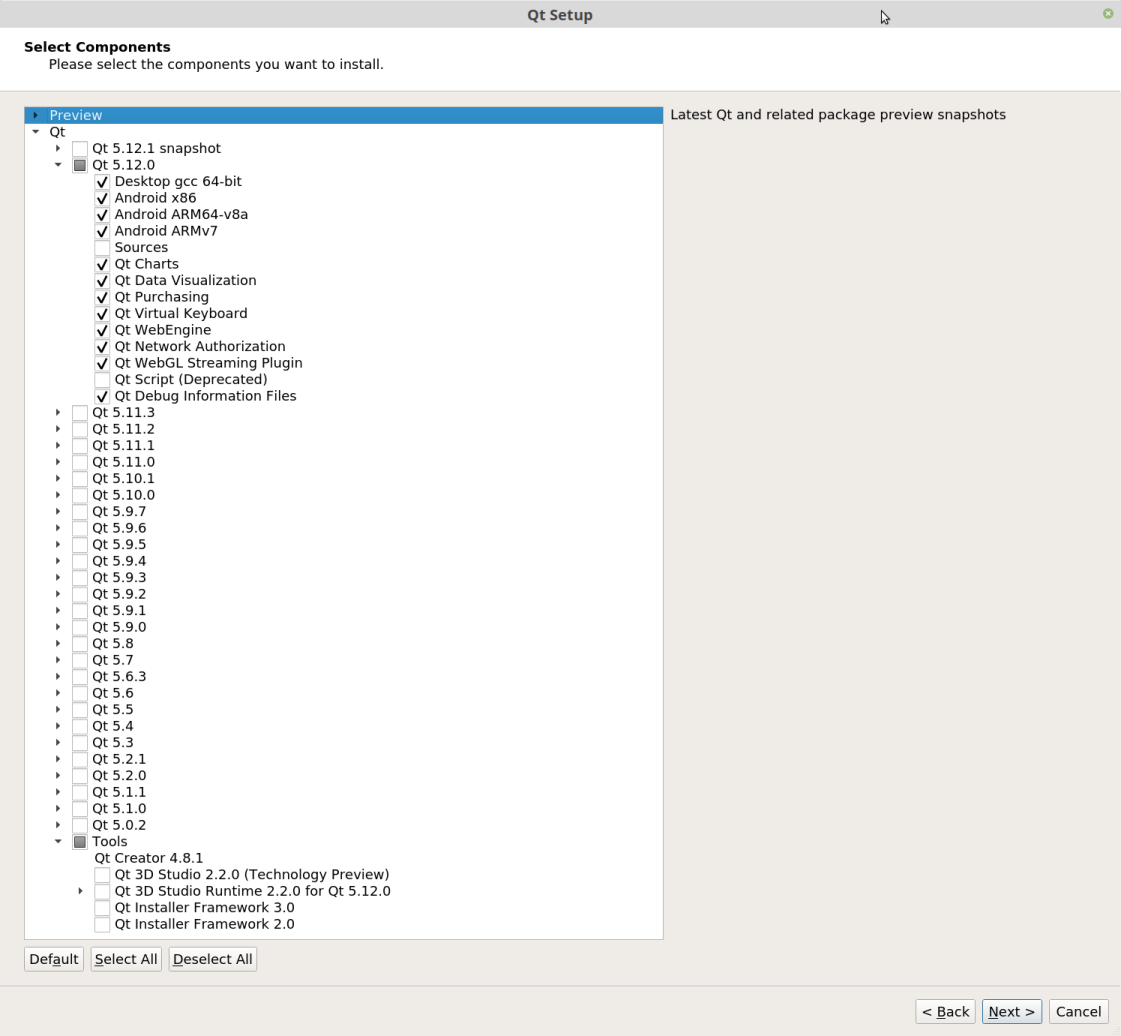
Make sure that the Tools and a version of the Qt libraries are selected, inside it also select the android packages (you can remove the sources packages and save some storage space):
Once the installation is finished you can add the qtcreator executable to the system PATH or link into a directory that is already in it:
sudo ln -sf /opt/Qt/Tools/QtCreator/bin/qtcreator.sh /usr/local/bin/qtcreator
Android Tools & SDK
We will use the Android Studio (that you can download here) to install the necessary Android components. Go to the directory where it was downloaded, unzip it and execute it:
unzip android-studio-ide-xxx.yyyyyyy-linux.zip
cd android-studio/bin
./studio.sh
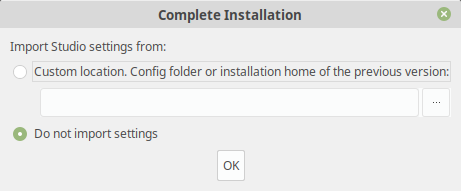
On the next screen, there is no need to import anything, but you can do it if you have a previous installation:
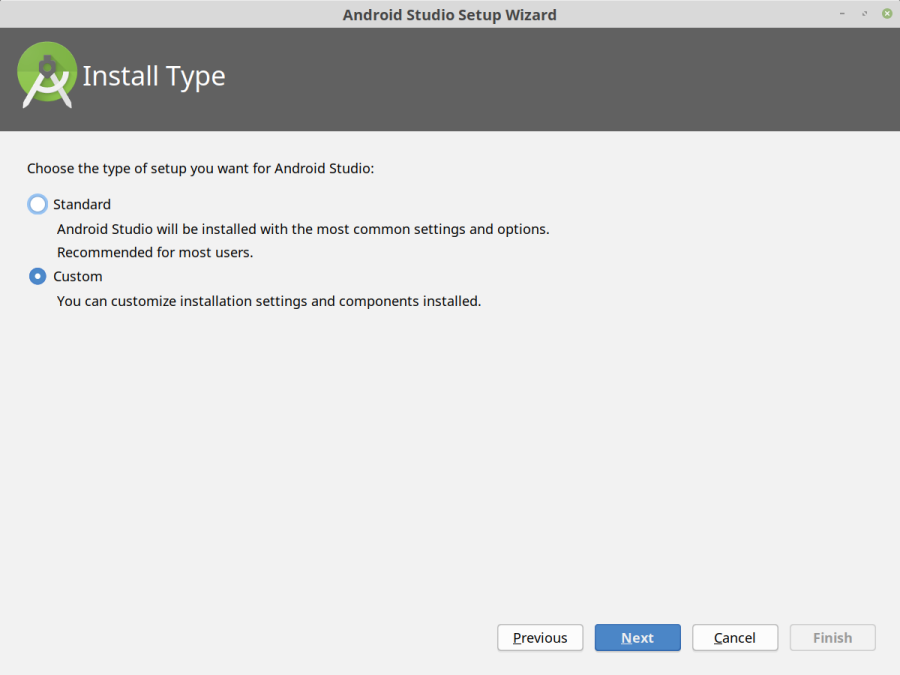
Then select custom installation:
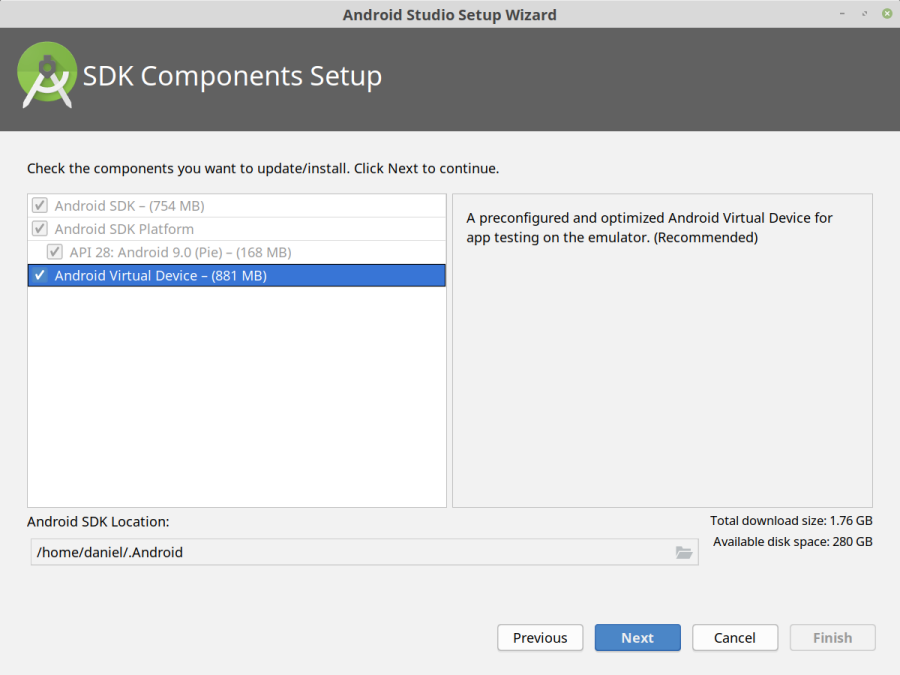
Then select the "Android Virtual Device" option to be able to test the android applications in a simulated device in your computer. You can also change the installation path of the android components (for example, I like to have them in the hidden directory ".Android" inside the home of my user account):
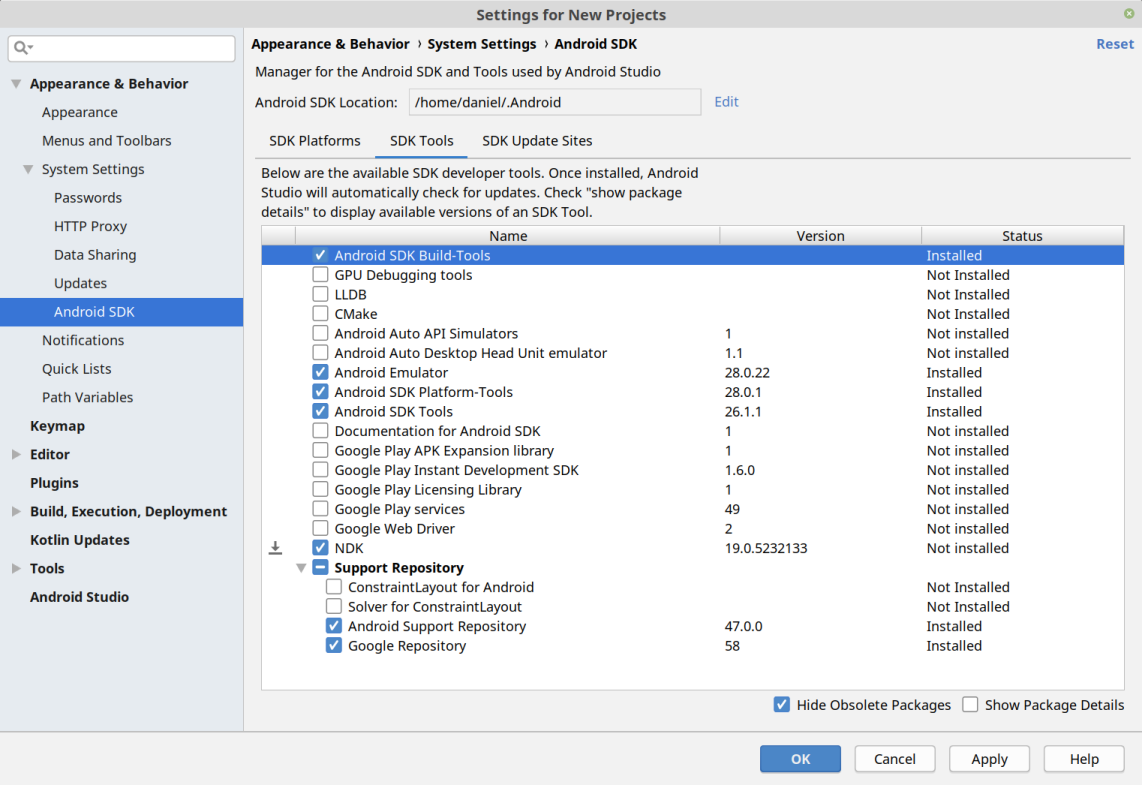
Then review the configuration and wait till all the android components are installed. When the starting window of the Android Studio start (if it does not start automatically, then launch it again) click on "Configure -> SDK Manager". Inside the SDK Manager click on "SDK Tools" and install the NDK component as shown in the picture:
You can install other SDK platforms to support older versions of Android.
Integrate Android Tools in QtCreator
First install the necessary dependencies, which include the java openjdk version 8, as newer ones might not work:
sudo apt install libstdc++6:i386 libgcc1:i386 zlib1g:i386 libncurses5:i386 libsdl1.2debian:i386 openjdk-8-jdk openjdk-8-jre
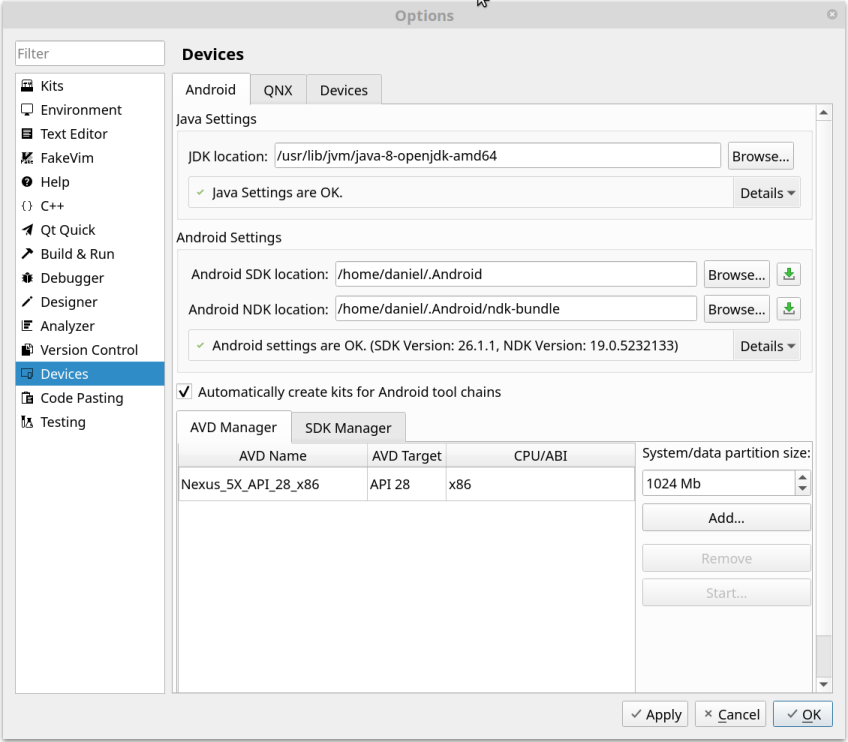
Then open QtCreator and go to the menu Tools -> Options -> Devices -> Android. There set the paths to the different components as shown in the next image:
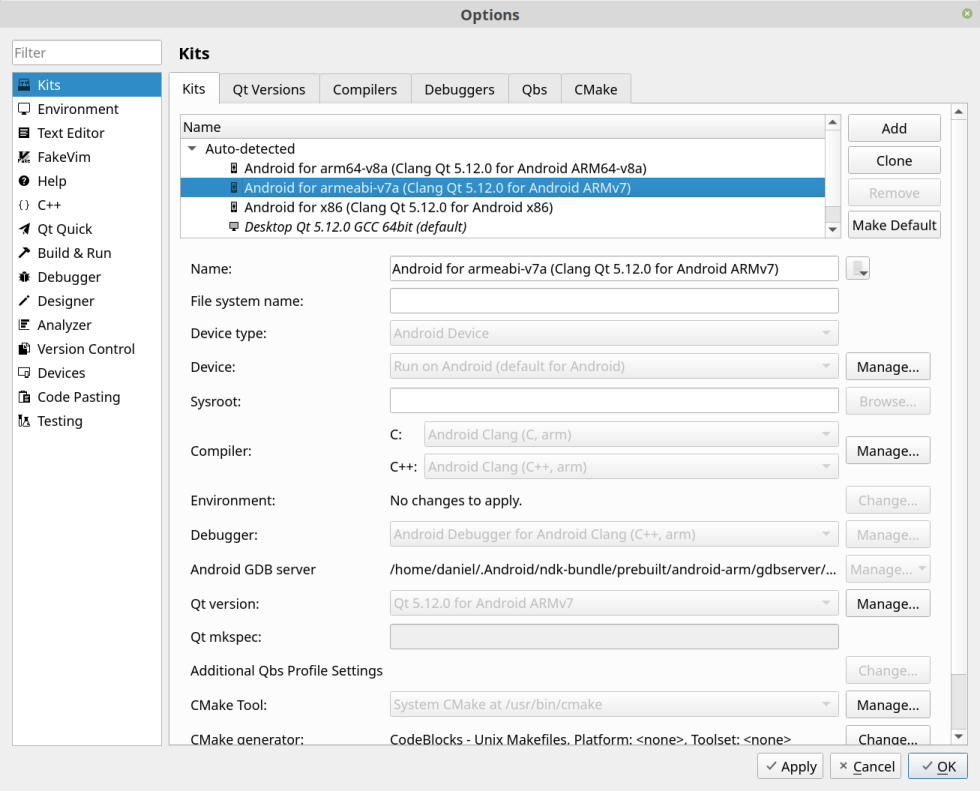
If all goes fine, the QtCreator building Kits for Android are automatically added:
From that moment QtCreator will be able to compile and generate apk files from your Qt applications so that they can be executed in Android.

